Sunday, December 27, 2009

Aaaahhhh.. Christmas!


It's hard to imagine it's almost time to pack up the tree. We had a great holiday with Kevin's folks and my mom coming in (separately) for a few days each.

I managed to get almost all the sewing done in time to get it under the tree-- and one of the girls (Kat) is enjoying her own sewing machine this year, thanks to Santa.


She got a little Janome Mini, and she has been sewing up a storm. This machine has mixed reviews. There's some great reviews of it on patternreview.com. Kat is only 6, turning 7- and it's a super machine for her. It really sews, winds bobbins and has some adjustments in stitch length.
One of her first projects was a drawstring bag- an easy beginning project if you are a new sewer yourself. I'll try to get the tutorial up later today.


Time to start gearing up for Valentine's Day :) I have some new designs up, in case you have the sewing bug. I'm also going to try my hand at pettiskirts again, after receiving two GLORIOUS fluffy ones for the girls at Christmas.


MaryKay is slowly trying to dig herself out from under a mountain if fabric, one tutorial at a time.

Monday, November 30, 2009

CYBER MONDAY SALE

EDITED TO ADD: This post is no longer valid :) Please see the website http://keepsmeinstitches.com for current specials. Thanks!


You knew I wouldn't be able to resist!

Buy 1 get 1 free on Etsy only. Please do not purchase your free design-- send it in Notes to Seller.

MaryKay is slowly trying to dig herself out from under a mountain if fabric, one tutorial at a time.

Saturday, November 21, 2009

New SALE!


Hooray! I recently celebrated my 170th sale. I'd really like to hit 200 by Christmas... and reward you for helping me. So here we go! I'm going to increase for a limited time, the number of free designs you can earn as follows:


  • Buy 3, Get 1 Free

  • Buy 5, Get 2 Free

  • Buy 7, Get 3 Free

  • Buy 9, get 5 Free


MaryKay is slowly trying to dig herself out from under a mountain if fabric, one tutorial at a time.

Friday, November 20, 2009

Turkey Applique SALE!


I love this little guy! So before you stuff yourself this week-- stitch up some fun.


Intro priced this week only for $1.50 on the website.


MaryKay is slowly trying to dig herself out from under a mountain if fabric, one tutorial at a time.

Tuesday, November 17, 2009

Wow! Need an Update- What a turkey!


Well, sometimes life gets in the way of blogging. A customer (thank you!) reminded me that my blog still shows the 60% sale-- thanks to all my great customers, I'm now at 154 Etsy sales!


The current sale is Buy 2, Get 1 Free! Here's how it works. Purchase your two designs on the same invoice. Then in the "notes to seller" indicate your free design choice. That's it! Please do not "buy" your free design, as Etsy will charge me fees for it.


AND... a new cute turkey and light saber applique designs are available on Etsy. I hope to have them up one my website later tonight.


MaryKay is slowly trying to dig herself out from under a mountain if fabric, one tutorial at a time.

Thursday, October 15, 2009

60 % off sale!


I've been really trying to build my feedback and #'s on etsy, so 10 sales ago I posted a 50 % at 50 sale. It was a great success!


So.... Yep. Till we get to 70, as long as you buy 2 or more designs, you will be refunded 60% of your purchase price!


Wow. That's about all I can say..... wow.


MaryKay is slowly trying to dig herself out from under a mountain if fabric, one tutorial at a time.

Sunday, September 20, 2009

New Designs


Couple of new designs up- I've been very busy preparing for TMUMC Fall on the Mound!


MaryKay is slowly trying to dig herself out from under a mountain if fabric, one tutorial at a time.

Saturday, September 12, 2009

Applique Christmas Tree

Brand new:

Applique Christmas Tree


MaryKay is slowly trying to dig herself out from under a mountain if fabric, one tutorial at a time.

Friday, September 11, 2009

Drill team design now available


I've been working on some shirts and other things for the Plano Williams High School Cheyannes. One of the problems with creating drill team spirit wear, is the lack of drill team designs readily available.


After finishing the design, I decided to offer it on my website. If you are interested in customizing this to match your own drill team uniform, please contact me.


MaryKay is slowly trying to dig herself out from under a mountain if fabric, one tutorial at a time.

Thursday, September 10, 2009

It's Greek to Me...


Thought you might like a glimpse of the new font. Bring back any college memories???


Seemes like with soccer practice, RE, school and other activities, we haven't had time to breathe around here. This one should be ready in two sizes by next week :-)


MaryKay is slowly trying to dig herself out from under a mountain if fabric, one tutorial at a time.

Tuesday, September 8, 2009

White Robots Can't Dance...


Robots.


They can do many things-- rhythm is not in their nature.


Coming soon, hopefully this week. I'm trying him with glitter fabric for a Disco ball head!


MaryKay is slowly trying to dig herself out from under a mountain if fabric, one tutorial at a time.

Sunday, September 6, 2009

New! Applique Girls are Weird Font


One of my favorite fonts, personally- now available as applique for your sewing machine!

MaryKay is slowly trying to dig herself out from under a mountain if fabric, one tutorial at a time.

keepsmeinstitches.com

Comes in three sizes of lowercase letters: 3" (fits 4x4 hoops) 4" and 5".

Some letters (like J, l, k) are taller.

Download it instantly with your payment! PLUS... Special sale through Labor Day, all fonts are $5!

Tuesday, September 1, 2009

I am Asleep Striped Eyemask Featured in Treasury


The eyemask is featured in a fun BNR treasury...

http://www.etsy.com/treasury_list.php?room_id=79495

MaryKay is slowly trying to dig herself out from under a mountain if fabric, one tutorial at a time.

Friday, August 28, 2009

My Popcorn Tote Is featured!

Just got the word. My little popcorn tote made an etsy treasury. I'm tickled pink!


http://www.etsy.com/treasury_list.php?room_id=78692


MaryKay is slowly trying to dig herself out from under a mountain if fabric, one tutorial at a time.
Wednesday, August 26, 2009

Tiny Tiger Toes (Geaux Tigers!)

If there's one thing I'm learning, it's never underestimate what people are looking for...


A while back I had digitized some tiny pawprints for Plano Senior High (Wildcats) ribbon. WHo knew others would be looking?


These tiny pawprints look great walking up a ribbon, accenting a bib, or on the bottom of a tiny shoe!

Each pawprint measures only .5" across, and the design also comes with a single.

http://keepsmeinstitches.com/


MaryKay is slowly trying to dig herself out from under a mountain if fabric, one tutorial at a time.

Friday, August 21, 2009

Tutorial - Recycling Hawaiian Pants, Repurposing clothes


Hmmm... I wasn't really sure what to call this one.

I bought a pair of Hawaiian pants - pretty wild Hawaiian pants. Let's just say a print that large doesn't look great on a derriere this wide-- capeesh? Well skinny pants really loved them. So...1. Remove the waistband. I did this with a seam ripper.
2. Take out the crotch seam first. I was able to cut mine out, since the size difference was fairly large.
3. Remove the inner leg seam. (Why inner? - In this case it was out of a desire to not have to resew the zipper!)
4. Lay out the legs, and draw a new crotch seam. (I used a current pair of pants to estimate this.)
You can see where her crotch seam doesn't even make it past the leg on the original leg!

5. Cut straight down from crotch seam, narrowing legs. (We can't have clown pants!)

6. Resew the inner leg seam. Turn one leg inside out. Put the right side out leg INSIDE the inside out leg, then sew the crotch seam.

7. I add to resew a new button hole, but if you use the correct end of your waistband, you wouldn't even have to do that!)
8. Rehem.
This post will have additional pics, as soon as I can get her in 'em.

Mary Kay

MaryKay is slowly trying to dig herself out from under a mountain if fabric, one tutorial at a time.

Wednesday, August 19, 2009

Letter D available today - come n get it!


Thank you guys, for being patient during my absence. I was saying goodbye to a family member who will be missed and remembered.


FREE Letter D is available today on the site.


MaryKay is slowly trying to dig herself out from under a mountain if fabric, one tutorial at a time.

Friday, August 14, 2009

Giraffe Monogram letters

Looks like I need to be away from the computer to tend to some family matters. I don't want my regulars to be disappointed, so I'll go ahead and put up the letters for the next 3 days, all at once. A 3-fer!

So download 'em now while they are free. I'll return to your regularly scheduled 1 a day on Tuesday. Thanks!

MaryKay is slowly trying to dig herself out from under a mountain if fabric, one tutorial at a time.

Thursday, August 13, 2009

Along came a spider...

A new spider !

Applique for the 5 x 7 hoop. Cut as you go in the hoop.

http://keepsmeinstitches.com


MaryKay is slowly trying to dig herself out from under a mountain if fabric, one tutorial at a time.

Wednesday, August 12, 2009

Letter E is up!


Okay giraffe font followers, letter E went up just after midnight. (What on earth was I doing up at that hour????)


MaryKay is slowly trying to dig herself out from under a mountain if fabric, one tutorial at a time.

Tuesday, August 11, 2009

Letter N Free today


Letter N of the Giraffe Monogram Embroidery font is available now until midnight. Get it now while it's FREE!


One letter is released each day (free for one day) then the whole set will be available at a discount. Miss one? The newsletter sign up coupon is good until 8/20 and will get you one additional letter free.


MaryKay is slowly trying to dig herself out from under a mountain if fabric, one tutorial at a time.

Monday, August 10, 2009

You say Cheyenne, and I say Chey-Annes!

I've been working with the Chey-Anne booster club on some spirit wear for the Chey-Annes parents, and in particular their logo. The Chey-Annes are the high kicking award winning drill team for Williams High School in Plano Texas.
It's Plano's oldest high school so they've had their logo a while. Last year, their spirit shirts showed the traditional logo of the Chey-Anne puffy sleeve girl.
The puffy shirt figure has been around for a while as a silhouette, so I wanted to see if we could leave the outline, but make her uniform look more like the girls current uniforms, shown here:


Never mess with tradition, right? So, treading lightly... I came up with the following:

It's a subtle change, but it shows the new gauntlets, while keeping the shape and similar outline.

They are off for approval, so we'll see. Too far?
Let me know what you think!


MaryKay is slowly trying to dig herself out from under a mountain if fabric, one tutorial at a time.

Sunday, August 9, 2009

Looking for L?


I was a little late getting the FREEBIE up today, but it's there now. If you want to follow the facebook page (left of this post) I'll post when the new freebies go up. Or, if you're a twitter-er, follow me on Twitter, and I'll tweet when they're up. You can be the first to know!


MaryKay is slowly trying to dig herself out from under a mountain if fabric, one tutorial at a time.

Wylie East Super E!


I am working on some new spirt wear for Wylie Eat High School. (Isn't there something about spirit wear that just makes you get all excited about school starting??)


I love their new "Super E" logo. So bold and modern looking.


MaryKay is slowly trying to dig herself out from under a mountain if fabric, one tutorial at a time.

Friday, August 7, 2009

Whimsical Sleeping Eye Mask Tutorial

Want to know how to make a simple spa mask? I got a request for making an eye mask for, well, the BEST BOYFRIEND EVER. Now, before my poor dh and all my friends have a heart attack, you should know it's not my bf.

But with an introduction like that, how can a girl help but smile???

Seems she's up late studying and his smaller eyemask isn't blocking enough light. Enter request. One green diagonal striped fabric eye mask with elastic back and "I am sleeping" in a specific font. I love bizarre requests. They bring out the doldrums and force the creative back in gear.

Now- part 1: bigger than normal for better coverage. The first step here was to draw a mask on a sheet of paper.

Why just draw 1/2? To make sure the sides are even, of course! Next, this shape is cut out, adjusted, redrawn, adjusted redrawn (repeat say 40 times....) then cut the final design out a second time, but with seam allowance around it.


You should also cut this shape of an inner lining fabric (I used a cotton interlock which is super soft) and an interior fabric (this should ideally be satin, microfiber, or in this case- a super soft bamboo terry in black. Make a sandwich of the fabrics like this:

First layer is the lining fabric, then the front fabric, pretty side up. Lastly the backing fabric, pretty side down.
Part 2: Measure your head with 1 1/2 inch elastic. As you sew, you'll want to attach the elastic as a layer of the sandwich, betweem the front and back layer.

Part 3: Stitch / Serge. Leave a 2 inch hole opening in the top for turning.

Part 4: Turn and press. Topstitch from the outside, catching edges inside.

Aaaahhhh... a good night's rest. From a seriously cute, sweet, and possibly THE BEST EVER girlfriend.

Think I'll make some up for the next slumber party... or better yet, do you feel an "in-the-hoop" project coming???


MaryKay is slowly trying to dig herself out from under a mountain if fabric, one tutorial at a time.

Next Free Font Letter posted


For those of you playing along, the letter T from the Giraffe monogram collection is FREE today.
These letters are machine embroidery files (not computer keyboard fonts, as one reader thought yesterday). They are only good for those using embroidery sewing machines. Thanks!
Measures 3.75" tall and available in most formats.


Here 's the link.


MaryKay is slowly trying to dig herself out from under a mountain if fabric, one tutorial at a time.

Wednesday, August 5, 2009

Free Monogram Giraffe Font


Today's free letter is A!
One letter a day will be offered FREE, before you can buy the whole set. Visit each day, and you can have the whole set FREE!

Letters are 3.75" tall and in fill pattern of giraffe spots with outline.

http://keepsmeinstitches.com/

MaryKay is slowly trying to dig herself out from under a mountain if fabric, one tutorial at a time.

Tuesday, August 4, 2009

Free Giraffe Font Alpha Monogram


I'm working on a new giraffe monogram set, and I'm offering them free! One letter will be offered each day, for 26 days.

Fill stitch motif with outline, these are not intended to be made into words. They are great for a monogrammed towel, bag or other project requiring a single large letter. Each measures 3.75" tall and will fit in most small hoops (4x4) Available in most formats- if you don't see what you are looking for, please ask!


Today's letter is K, don't miss it! Once all 26 have been given away, the set will be available at regular price only.

Check the store KeepsMeInStitches.com for the link to download your letter. You will need to add it to your cart, but since it is FREE, no shipping information is required.

MaryKay is slowly trying to dig herself out from under a mountain if fabric, one tutorial at a time.

Sunday, August 2, 2009

Monday morning mending- Tutorial on v-neck dress alteration

Okay, it's really Sunday. ... too bad.
I have a couple of dresses (poly/spandex ) from one of the big box warehouse stores. I really like them, but they never fit quite right. I've lived with them because they have no separate sleeve pieces, so taking them up at the shoulder meant the arm hole would get smaller-- and area where honestly I need MORE room.
Then it occured to me, (ta da! ) that I didn't have to keep the line of the dress exactly the same. I could alter the neckline shape and take height out of the shoulder, without sacrificing arm space.
In case you have a similar dress-- this might help someone.
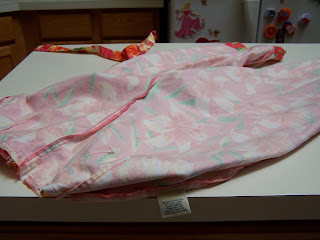
Here's the dress in question: Notice that the top is a little loose, caused by being to short!

Here's the dress laying flat.

The idea was to take up the neckline, without altering the armhole. The red line indicates the alteration. This leaves all the arm space, while helping the front and back fit better.


Before makeing the new seam, I needed to remove the "finished" hem from the arm and neck opening, where the new seam would meet. I did this using a needle, then a seam ripper. The edges were just a coverstitch with folded under and stitched, I did not remove the coverstitching.


Now, I took more fabric from the front than the back. After playing around with different pinnings, this provided the best option.


Then I took the seam up on each side. My serger happens to be under the weather, so I used a stretch zig zag, trimmed that close, and did another row of stretch straigh stitching. Then I restitched the hem edge back using brown top thread.
A quick, needed improvement which makes the dress a better wear for church and work.
MaryKay is slowly trying to dig herself out from under a mountain if fabric, one tutorial at a time.

Girls Rule - ?


Someone was looking for this design, so I digitized it as pre-work. Hmmm... wonder what it's going on???

MaryKay is slowly trying to dig herself out from under a mountain if fabric, one tutorial at a time.

Thursday, July 30, 2009

Tutorial - Making a drawstring backpack

Aaahh... camp time. An embroidering Mommy's dream time. (Honestly, EVERYTHING nees a name? How can I beat that!)

Off to camp she goes tomorrow- for the first time. They have to bring a little drawstring bag to carry their water bottle/sunscreen/etc around with them, so I whipped these up for her and her friends.
I'm going to give dimensions, but I made these for girls under 7. You might want to make yours a wee bit bigger if it is for someone larger.


First, you'll need a piece of fabric, in a rectangle shape. I used a piece of Michael Miller Dumb Dot pink, measuring 14" tall by 22" wide. Fold this in half horizontally, and work on one side first.
If you want to put the name on it, do that first.


Then working just on one half, make two button holes 1.5 inches down from the top. Make these close to the edges of the 1/2- as they will be on the top edges of the finished bag.

Next, finish the raw top edge. You can either turn it under and stitch it, or run it through your serger. This will not show, it's just to make the bag wear better.


Now. fold the bag in half, right sides together, and serge or seam and finish the edge.


Now you have a tube of fabric. Turn under 1 inch of the fabric (with your finished edge turned underneath.) This will make a casing for the drawstring that has a button hole on each side. Stitch the casing close to the edge. Make sure you catch the turned under fabric, and that your button hole is in the casing, not below it.

Cut two small squares of interfacing and fabric, and place these in the bottom corners. This will reinforce the corners and make them stronger for the grommets.


You can tack them down with stitches, or a tiny bit of fabric glue to hold them in place.

Stitch the bottom seam, catching the squares of fabric. Then, turn your bag inside out.
You now have a small pillowcase!

On the bottom corners, put in grommets.
Now, you're ready to add the straps! The straps can be made of anything, but I prefer multicorded braid. You will need two pieces, each twice the height of the bag + the twice the width of the bag. (For these bags, it takes 2 pieces, 1.5 yards each.)

Starting on the right side of the bag, feed the cord through the button hole, and back out the same button hole after going around the casing. There is a button hole on the other side, but do not go out that button hole. The string should start and end on the same side.

Repeat this with the other side. This means when you are finished, there will be two drawstrings at the top, ending on opposite sides.

Even out the cord, and pull both ends through the grommet at the bottom and tie a knot. (The knot should be on the pretty, embroidered side of the bag.) Do this on both sides.

That's it! Super simple!
Wouldn't those be a cute little take home gift from a slumber party?

MaryKay is slowly trying to dig herself out from under a mountain if fabric, one tutorial at a time.

Wednesday, July 29, 2009

Tutorial - Make your own bow cards

Something for the bowheads! :)

I'm not a huge maker of bows. Every once in a while though, the mood (or idea) strikes me and I can't resist.
Since I don't do this all the time, I wanted away to present my bows neatly, without a lot of fuss. Enter the homemade bow card.

I ordered (Vistaprint.com) postcards with two imprints on the same card. They are basically my business card template- except they have a place to price and size. I use these with my clothing often as hangtags. Why postcards? I like the white spaces at the end. I cut the two prints apart, retaining the white space.

Now, to turn this into a bow card, I get out the exacto knife.
Cut two parallel slits (very close together) on one side and two on the other. To determine the distance of these two sets, measure the length of the barrette or clippy prong, then reduce the size slightly. (A 2" barrette needs to have slit sets that are 1.5" apart, for example.)

Then, still at the cutting board, cut a diagonal slit between the parallel slits. (Photo.)


This opens the area for inserting the bow. If you have hang racks, the other side can have a punch hole in it to hang from the pegs.
Cheap and quick, but still professional looking!


MaryKay is slowly trying to dig herself out from under a mountain if fabric, one tutorial at a time.